Farmhouse Sink Reveal: Positive, Zero, or Negative?

A farmhouse sink reveal describes how the countertop opening meets the basin installed beneath it.
- A positive reveal leaves a narrow strip of the sink rim visible.
- A zero reveal aligns the countertop edge with the inside edge of the basin.
- A negative reveal allows the countertop to overlap the upper rim slightly.
The choice affects cleaning, appearance, fabrication accuracy, accessory clearance, and future replacement. It does not describe how far the apron front extends beyond the cabinet.
At Nozloo, we treat those as separate installation decisions: the reveal belongs at the basin opening, while apron projection belongs at the cabinet front. For more on that distinction, see Farmhouse Sink vs. Apron Sink.
What Is a Sink Reveal?
Reveal terminology applies mainly to an undermount sink because the basin is mounted below the counter. Looking down into the finished opening, you will either see part of the rim, see the two edges align, or see the countertop cover the rim.
The American Society of Plumbing Engineers’ explanation of positive, negative, and zero reveal uses the same three-part classification based on the exposure of the sink rim.
A top-mount or drop-in sink works differently. Its lip rests above the countertop and covers the cutout.
The final appearance is created by three factors:
- The shape of the actual sink
- Its position below the counter
- The size and location of the countertop opening
That means the reveal needs to be selected before fabrication—not after the countertop has already been cut.
Positive Reveal
A positive sink reveal exposes a narrow ledge of sink material around the sides and back of the basin.
The visible rim makes the sealed joint easier to inspect. Water, crumbs, and food particles remain in view rather than collecting beneath a concealed countertop overhang.
This approach can also accommodate minor differences in sink geometry more easily than exact edge-to-edge alignment. However, the spacing still needs to be even. A wider strip on one side can make the sink appear off-center.
The trade-off is an additional horizontal surface to clean, particularly behind the basin near the faucets. The sealant line may also be more noticeable.
A larger countertop opening may offer slightly more flexibility if the sink is replaced later, but replacement is never guaranteed. The new model must still match the cutout shape, corner radius, cabinet opening, mounting method, and support structure.
Zero Reveal
With a zero reveal, the countertop edge follows the inside edge of the sink as closely as possible.
It creates a clean transition without an exposed ledge or a deliberate overlap. Crumbs and water can move toward the basin without crossing a broad shelf.
Precision is the main concern. The sink must be centered correctly, and the cutout must follow its shape closely. If the basin shifts during installation, part of the rim may appear on one side while the opposite side sits beneath the counter.
“Zero” is best understood as a visual goal rather than a guarantee of mathematical alignment at every point. Small differences can be more noticeable around a formed or fired sink, particularly near curved corners.
This option works best when the physical sink is available before fabrication and the fabricator can verify its final position.
Negative Reveal
A negative sink reveal allows the countertop to extend inward over the upper rim. From above, the sink edge and most of the mounting joint are covered.
The overlap creates a sleek outline and lets crumbs be wiped directly from the counter into the basin without crossing an exposed ledge.
The concealed underside still requires cleaning. Moisture, grease, and debris can collect beneath the overhang even when they are difficult to see.
The overlap should remain modest. Too much can:
- reduce the usable basin opening;
- create a deeper underside to clean;
- interfere with fitted workstation accessories;
- expose the projecting countertop edge to cookware impact;
- limit compatible replacement sinks.
A negative reveal can look streamlined, but it should not be treated as maintenance-free or automatically more hygienic.
Positive, Zero, and Negative Reveals Compared
| Type | Countertop relationship | Main advantage | Main consideration | Best when |
|---|---|---|---|---|
| Positive reveal | Counter stops outside the basin opening | Rim and joint remain visible | Exposed ledge needs cleaning | You want easy access to the joint |
| Zero reveal | Counter aligns with the inside basin edge | Clean, balanced transition | Templating and centering must be precise | Visual alignment is the priority |
| Negative reveal | Counter overlaps the upper rim | Covers the sink edge and joint | Hidden underside needs cleaning | You prefer a covered rim |
There is no universal best choice. The most suitable option depends on which surface you are willing to clean, how closely the sink can be templated, and whether accessory or replacement clearance matters.
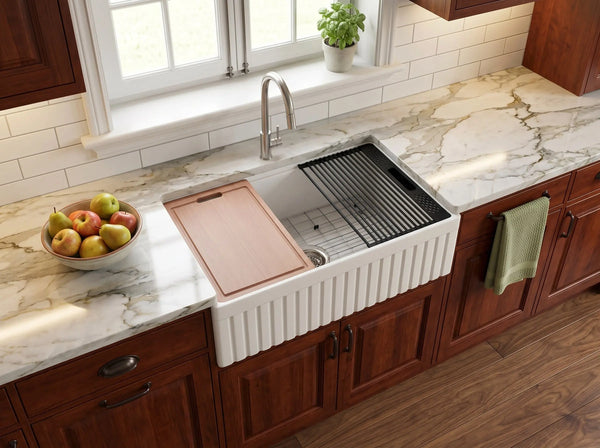
How Reveal Affects a Workstation Sink
A workstation sink has an internal rail that supports accessories such as a cutting board, drying rack, or colander. That rail is separate from the countertop opening, but the two can affect each other when the overlap is too deep or the cutout is inaccurate.
At Nozloo, we treat the workstation rail and countertop cutout as separate dimensions:
- The rail supports accessories inside the basin.
- The reveal controls how the counter meets the upper sink edge.
Before approving the template, place the supplied accessories on the actual sink and check that each one:
- rests fully on its intended ledge;
- can slide or sit in its normal working position;
- can be lifted out without catching the countertop;
- remains usable on both sides of the basin.
This physical check is more reliable than assuming all workstation models use the same ledge position.
Homeowners comparing ledge-equipped models can browse the Fireclay Workstation Sink Collection. For more information about cutting boards, drying racks, bottom grids, and drain components, see the Farmhouse Sink Accessories Guide.
Why the Actual Fireclay Sink Matters
Fireclay sinks are formed, glazed, and fired rather than stamped from a thin sheet. Minor dimensional or geometric differences may occur during that process.
These differences are most noticeable when:
- the countertop must align closely with the basin;
- only a narrow strip of rim will remain exposed;
- the corners have a curved or slightly variable profile;
- workstation accessories require precise clearance.
A sink described as 30 or 33 inches wide does not need a generic 30- or 33-inch countertop hole. That figure normally describes the overall product width, not the exact basin opening.
Because Nozloo focuses specifically on fireclay farmhouse sinks, our practical recommendation is to have the physical unit available before the countertop template is approved. A paper template is useful, but the actual sink lets the fabricator verify its corners, rim profile, and installed position.
The same caution applies when replacing a sink beneath an existing countertop. Two models with the same advertised width can have different bowl openings and corner radii.
For broader information about the material, sizing, and installation planning, see the Fireclay Farmhouse Sink Guide.
What to Confirm Before the Countertop Is Cut
For natural-stone countertops, the Natural Stone Institute’s Dimension Stone Design Manual is the relevant industry reference. Its table of contents includes dedicated chapters covering stone counter and lavatory tops, wet areas, and fabrication and installation tolerances.
The manual does not select a reveal for your sink. That decision still needs to be coordinated with the sink manufacturer, countertop fabricator, and installation plan.
Before approving the cutout, confirm:
1. The reveal type
Record positive, zero, or negative rather than using vague instructions such as “make it flush.”
2. The intended width
Specify how much rim should remain visible or how far the countertop should overlap it.
There is no universal measurement that works for every sink.
3. The sides included
Confirm whether the same relationship applies to both sides and the back of the basin.
4. The physical sink
Make the actual unit available for measurement or verification according to the fabricator’s process.
5. The installed position
Confirm that the basin will sit centered, level, and properly supported before the final opening is approved.
6. Workstation clearance
Test the cutting board, rack, colander, and other fitted accessories on the actual sink.
7. Faucet space
Make sure the cutout leaves enough countertop behind the basin for the selected faucet, soap dispenser, or other fixtures.
8. Future replacement
Consider whether a smaller opening or highly specific corner profile could restrict replacement options.
Once the countertop has been cut and its edge polished, changing the opening may require further fabrication and may not be practical.
For the complete installation sequence—including cabinet support, dry-fitting, leveling, countertop templating, and sealing—see How to Install a Fireclay Farmhouse Sink: A Step-by-Step Guide.
Common Mistakes to Avoid
Confusing the Reveal With Apron Projection
The reveal belongs around the basin opening. It does not describe how far the exposed front sits beyond the cabinet.
Selecting the Sink After Templating
Sinks with the same nominal width can have different rim shapes, bowl openings, and corner radii.
Using Product Width as the Cutout Dimension
The overall sink width is not the countertop opening size. The actual unit and approved template should guide fabrication.
Asking for “Flush” Without Defining It
“Flush” can mean exact alignment to one person and a slight overlap to another. Record the intended type and width.
Making the Ledge or Overhang Too Large
A wide exposed ledge collects more residue. A deep overlap covers more of the basin and creates a larger hidden surface to clean.
Ignoring Accessory Movement
A cutting board may fit on its rail but still be difficult to remove if the countertop covers part of its lifting path.
Final Recommendation
Choose the reveal before the countertop is fabricated, but do not base the decision on a styled photograph alone.
Use the actual sink, test any workstation accessories, record the intended opening, and review the template with the fabricator. A carefully coordinated cutout matters more than choosing a particular style because it looks popular in another kitchen.
Frequently Asked Questions
What Is the Best Reveal for a Farmhouse Sink?
There is no universal best option. The right choice depends on whether you prioritize access to the rim, precise alignment, or a covered mounting joint.
Is a Positive or Negative Reveal Easier to Clean?
They require different maintenance. A positive reveal has a visible ledge, while a negative reveal has a concealed underside that can be easier to overlook.
How Much Positive Reveal Should Be Visible?
Use the width approved for the specific sink and countertop. Rim geometry, manufacturer guidance, fabrication requirements, and accessory clearance can all affect the measurement.
Is a Zero Reveal Completely Flush?
It is intended to look flush, but small variations may remain because of sink geometry, positioning, or fabrication tolerances.
Can a Fireclay Sink Use a Negative Reveal?
Yes, provided the sink design, countertop material, manufacturer guidance, and accessory clearance support the overlap.
Does the Reveal Affect Future Replacement?
Yes. The existing cutout size, corner shape, and edge profile determine which replacement sinks can fit beneath it.
Should the Sink Be Present During Templating?
Follow the countertop fabricator’s process, but the physical sink should generally be available for measurement or verification before the opening is fabricated.